What Is Sidechaining? – How and When to use Sidechain Compression
If you’re just getting started with music production, chances are you’ve heard the terms compression and sidechaining being thrown around. Compression is one of the most popular tools in both production and live performances. So whether it be House, Pop, or Hip Hop Music, there’s a good chance your favourite songs are using some kind of compression to help deliver a clean mix. Generally, most compressors work independently, focusing on controlling the output of a single channel in your mix. In contrast, using Sidechaining or Sidechain Compression makes sure a particular sound is compressed, relative to other sounds in your mix.
In this article, we cover all you need to know regarding compression and sidechain. Explaining what it is, how you use it, when it’s used, as well as some iconic examples from popular songs.
- Compression
- Parameters On Your Compressor
- Sidechain Compression
- Dialogue Ducking
- Vocal Mixing
- Letting the kick punch
- How To Use A Sidechain Compressor
- Popular Sidechain Compression Plugins
- Examples Of Sidechaining In Music

Compression
To understand Sidechaining and Sidechain Compression we must first cover the basics of Compression, and how to use a compressor.
Originating in the early days of recording in order to maintain a consistent output from vocalists; Compression is a dynamic processing tool used to keep an audio signal within a specific dynamic/volume range.
Essentially, compressors are useful for making your loud sounds softer. So you can boost the overall level of a track while narrowing the dynamic range. Resulting in a much cleaner, and more enjoyable mix.
Using a compressor on your audio track starts by picking a volume level you always want your instrument to sound at (never louder, never softer). Then, you’ll set a compression level to determine how sensitive your effect will be. Resulting in every note played too quietly to be boosted into your volume range, and every note too loud to be softened to fit the range. So, your instrument will always be heard within the dynamic range you specified.
Even after reading this, you might still be a bit confused when you’re staring blankly at your plugin or hardware. So, we’ve outlined some of the most common terms to help you out!
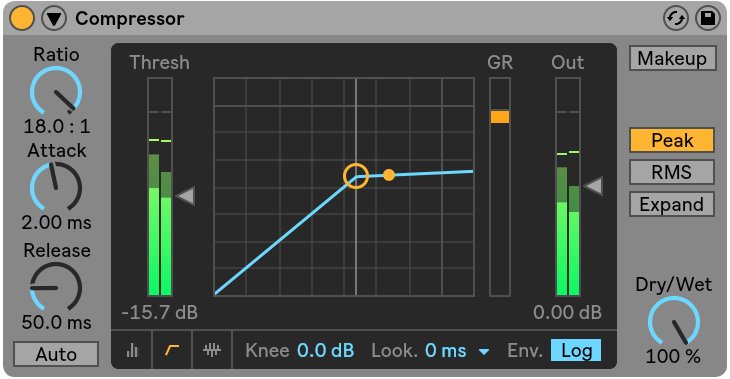
Parameters on your compressor
Threshold
Perhaps the most important parameter on your compressor. Setting the threshold means that any sounds on the track louder than this will be reduced according to the ratio. While leaving sounds sitting lower than this level alone.
Ratio
The ratio determines the intensity of compression for sounds sitting above the threshold. Therefore, at a ratio of 2:1, any sound 2dB above the threshold will be reduced by 1dB. While at a ratio of 10:1, the sound will be reduced by 1.8dB. Therefore, the higher the ratio, the harder the compressor will work. It’s worth experimenting to find the ratio that works best for your sound.
Peak
Adjusting the peak parameter determines how your compressor perceives the loudness of the sound.
Attack/Release
Using the attack parameter on your compression, allows you to determine how quickly the compressor engages. While the Release parameter will determine how quickly it shuts off.
Knee
The Knee determines the onset of your compression. Using a low knee on instruments like drums and guitar generally sounds better. While a higher knee placed on vocals can make your voice sound smoother and more natural.
Furthermore, using a multiband compressor can isolate multiple frequencies and compress them, while leaving other frequencies alone.
Sidechain Compression
Sidechain compression differs slightly from compression. Working to control the level of a particular sound, relative to other sounds within your mix. For example, the compression level of your bass track may be controlled by the volume of your kick drum. So, when your kick drum sounds, your bass becomes more compressed. Therefore, both sounds can keep cutting through the mix. And allowing the kicks to dominate the mix without clashing with the sound of the bass. Therefore, providing a pulsating, and rhythmic dynamic to the sound.
Sidechaining has a number of different uses, so today we’ll explore just a few of its most common applications.
Dialogue Ducking
Since the introduction of sidechaining, Dialogue Ducking has been one of the most common uses of the technique. Automatically reducing the volume of music to make way for vocals. There are numerous examples showing dialogue ducking in action such as; when you’re at the supermarket and the music softens in order for somebody to make an announcement; and when the music drops in volume on the radio while the host speaks.
Vocal Mixing
Vocals are consistently the main focus of every song. You want your vocals to stand out, be loud enough, and be heard clearly. If your vocals are getting a little bit lost in the mix, you may be tempted just to turn them up. However, by sidechaining other tracks to your vocals, you can make sure that your other tracks quieten down to make room for your vocals. Letting your vocals shine while minimizing unwanted distortion or clipping.
Letting The Kick Punch
You’ll notice most Pop and Dance songs feature super punchy kicks along with sub-bass. Using these elements together without proper separation can be a recipe for disaster. Resulting in clashing frequencies and in turn, a muddy, unpleasant mix. Like the example above, in order to avoid this, you’d simply add a compressor to your bass track, while sending your kick’s signal to the sidechain input. Helping you to clear up the clashing frequencies and really make your kick drum pop!
To achieve a different and more stylistic effect; you can even sidechain other sounds like synths, leads, and even vocals to center your rhythm around the kick drum.
How To Use Sidechain Compression
Although you can make use of hardware compressors, sidechain is most frequently used via software and plugins on your computer. So if you’re producing your tracks using one of our popular Digital Audio Workstations, it’s likely your software has a means for sidechain compression built-in. However, many professional producers prefer to use third-party VST plugins to apply this effect as well.
We’ve found a few video tutorials touching on sidechain compression in a couple of the most popular DAW’s, so you can follow along yourself.
Ableton Live
FL Studio
Reason
Popular VST Plugins
The first stop to sidechain compression should be the stock compressors in your DAW, and it’s a great place to learn how compressors work. However, if you’re really looking to perfect the punch on your drums, we’ve put together a list of some of the post popular Sidechain Compression plugins around.
Nicky Romero Kickstart

Drop the Nicky Romero Kickstart into your DAW, and it immediately applies sidechain-style compression to your track. Featuring four timing settings, as well as 16 waveshapes to adjust the timing and severity of the effect. Something you’d otherwise have to manually dial in using the controls we listed earlier, with less visual feedback. You can even trigger the effect of incoming MIDI notes.
Coming in at $15USD, the Nicky Romero Kickstart plugin is affordable, while also accomplishing its goal of pulsing, sidechain style compression. Perfect if you’re producing Dance music!.
Cableguys VolumeShaper

Cableguys VolumeShaper is perfect if you want to get creative with your sidechain. Allowing you to create and save your own waveshapes by clicking and dragging different points on the grid. While it also includes a bunch of ready-made presets and Ducking waveforms if you’re looking to quickly apply some basic sidechain compression. A little more expensive at $34USD, but worth it if you’re looking for even more customization.
Xfer LFOtool

Xfer LFOtool is not only ideal for applying sidechain compression but offers a whole host of other features. Offering a range of built-in presets to give your track a variety of effects. And with 6 impressive sidechain presets, you’ll be up and running straight away. However, with more effects comes a higher price tag, coming in at $49USD.
Examples of Sidechaining in Music
Although sidechaining can be used in any genre, it’s mostly associated with EDM and other music you’d often find pumping at a nightclub. Featuring propulsive, 4/4 time signatures, these genres of music rely on steadily pumping bass sounds to get people dancing. Whether it be the bass guitar, kick drum, or synthesizer – the sidechain effect is one that’s become synonymous with club music.
For Example: Take a listen to Daft Punks “One More Time”. When the kick drum enters the mix at 00:45, it has a pulsing effect on the rest of the song.
Not only used in club music, but sidechaining was also made popular in the Hip Hop genre by none other than J Dilla. Who used sidechaining along with the ducking technique to lower the volume of samples, while the hard-hitting kicks shined through. Innovating this sound within Hip Hop, you can immediately tell a J Dilla beat when you hear one! Take a listen!
Although regular compression is used to bring out sounds in all genres; it’s likely you’ll never hear sidechain compression in acoustic-based or classical music.
Take your music to the next level!
Sidechain compression is a popular tool in music production for a reason. Hopefully, this article taught you a little bit more about what sidechaining is and how you can use it to beef up your songs! So crack open your DAW and start creating!
If you’re just getting started and don’t already have a Digital Audio Workstation; check out our range of music production software and you’ll be producing hits in no time!